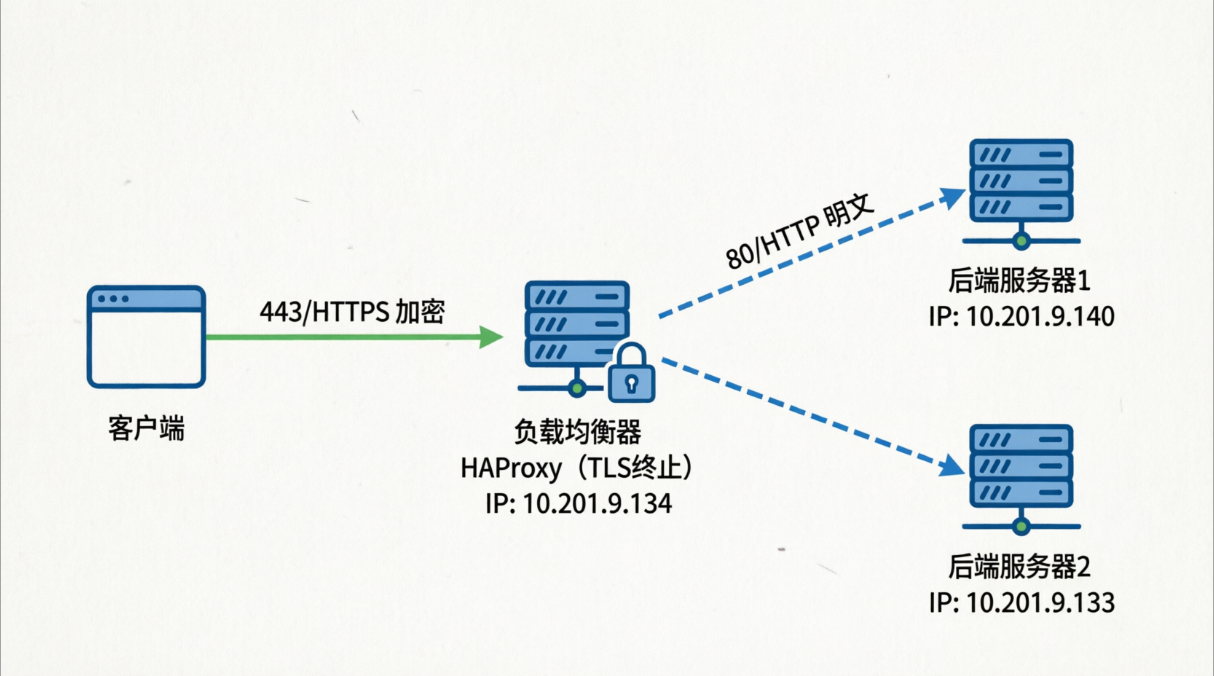
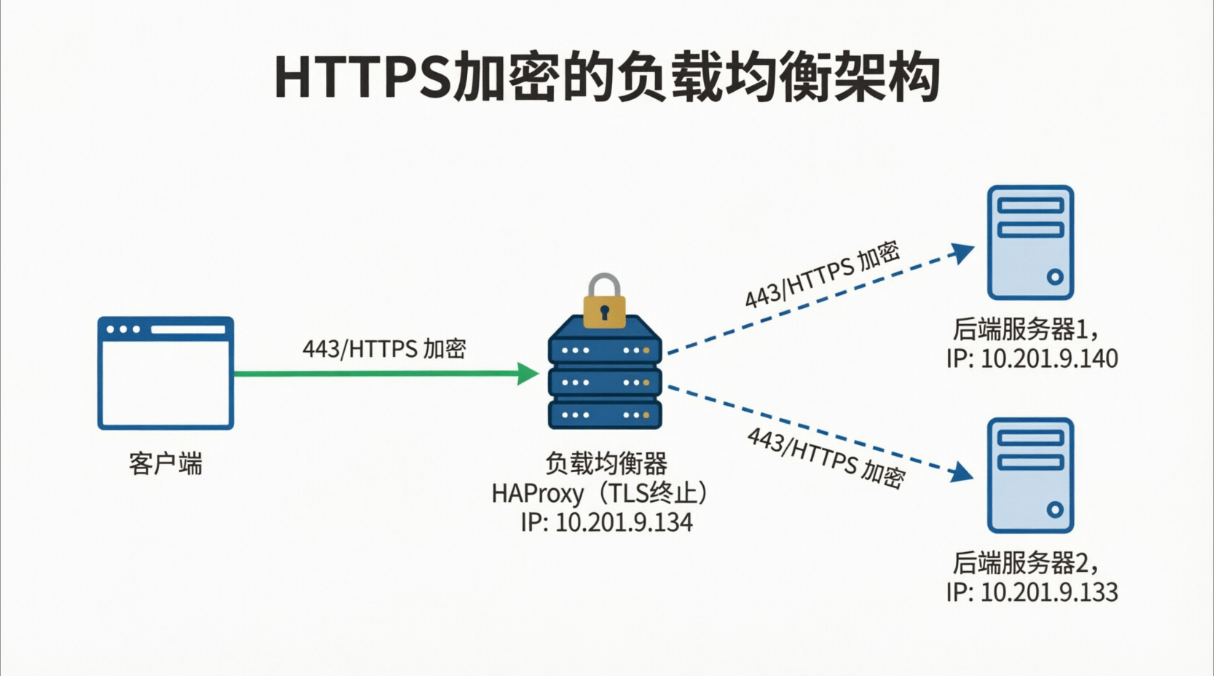
HAproxy负载均衡集群部署实例 tls加密负载均衡: HAProxy TLS 终止负载均衡架构详解 HAProxy TLS 终止(也称为 TLS 卸载)是指 HAProxy 作为反向代理,在客户端与 HAProxy 之间建立加密的 HTTPS 连接,而在 HAProxy 与后端真实服务器之间建立未加密的 HTTP 连接。如下图:
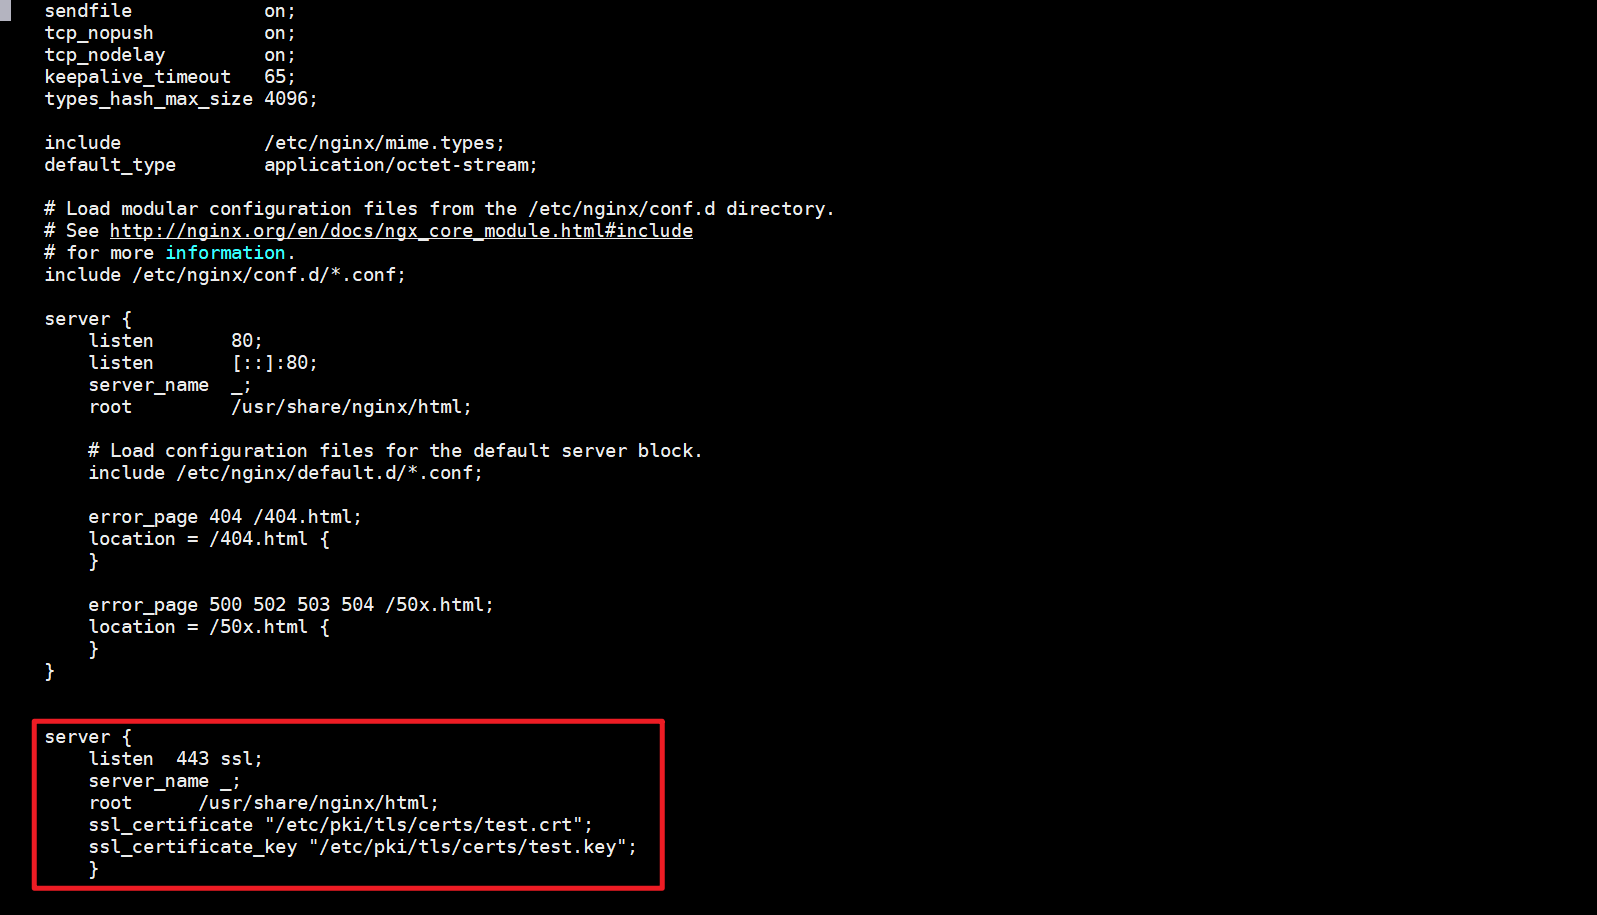
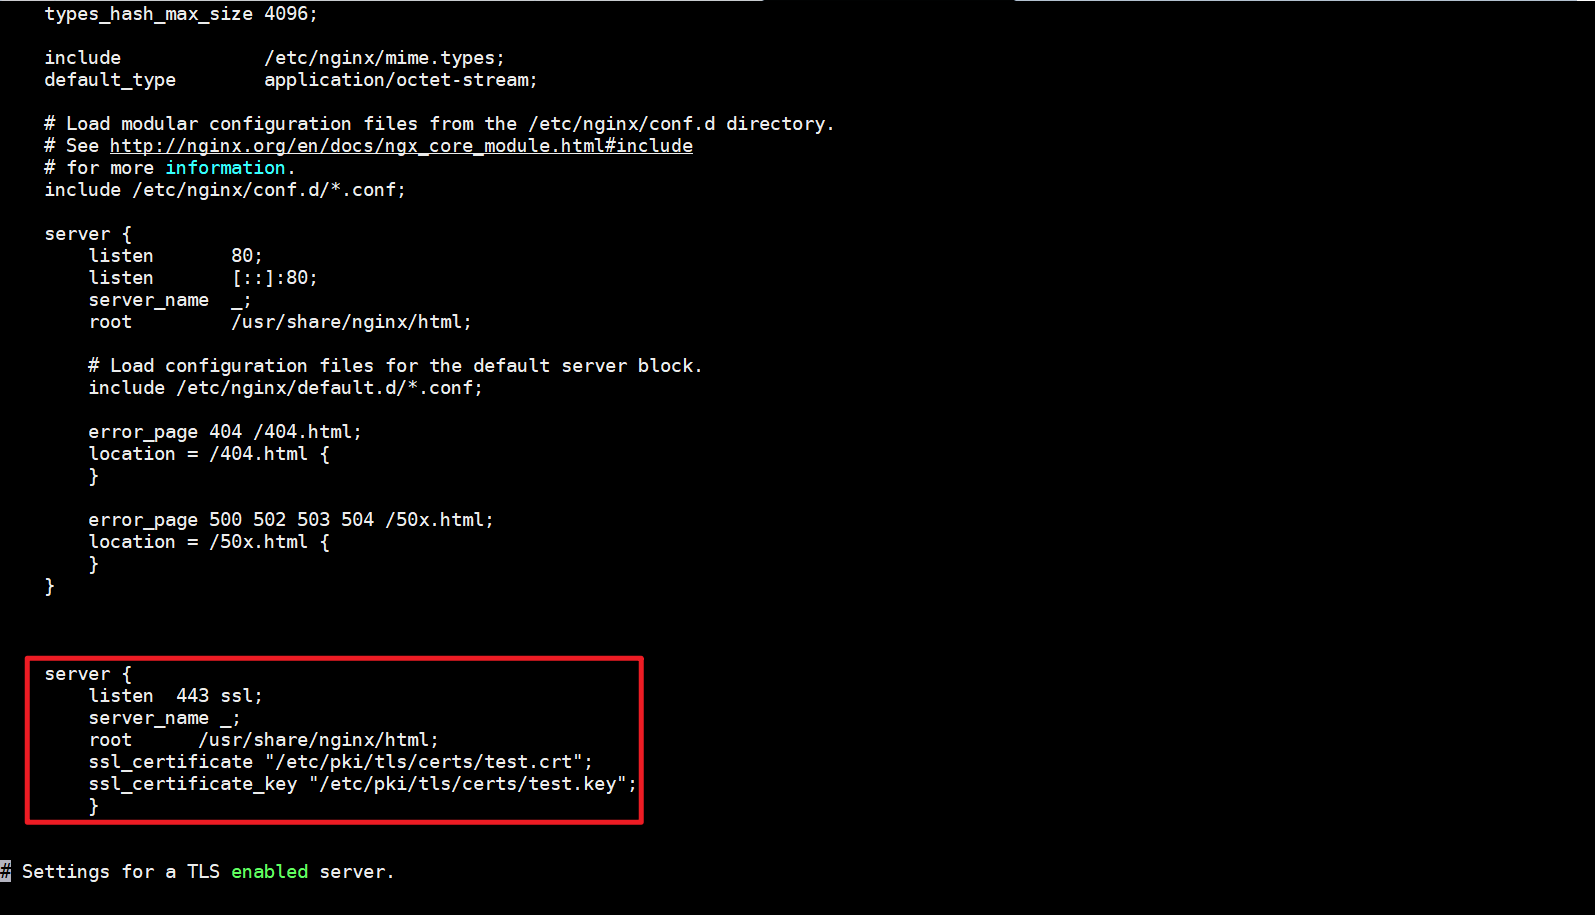
获取ssl证书 在修改配置之前,需要先生成一个https的证书,当前测试我们可以使用自签证书。
1 2 3 4 5 6 7 root@centos-manager tls]root @centos -manager tls ]2048 bit RSA private key'/etc/pki/tls/certs/test.key' -----
1 [root @centos -manager tls ]
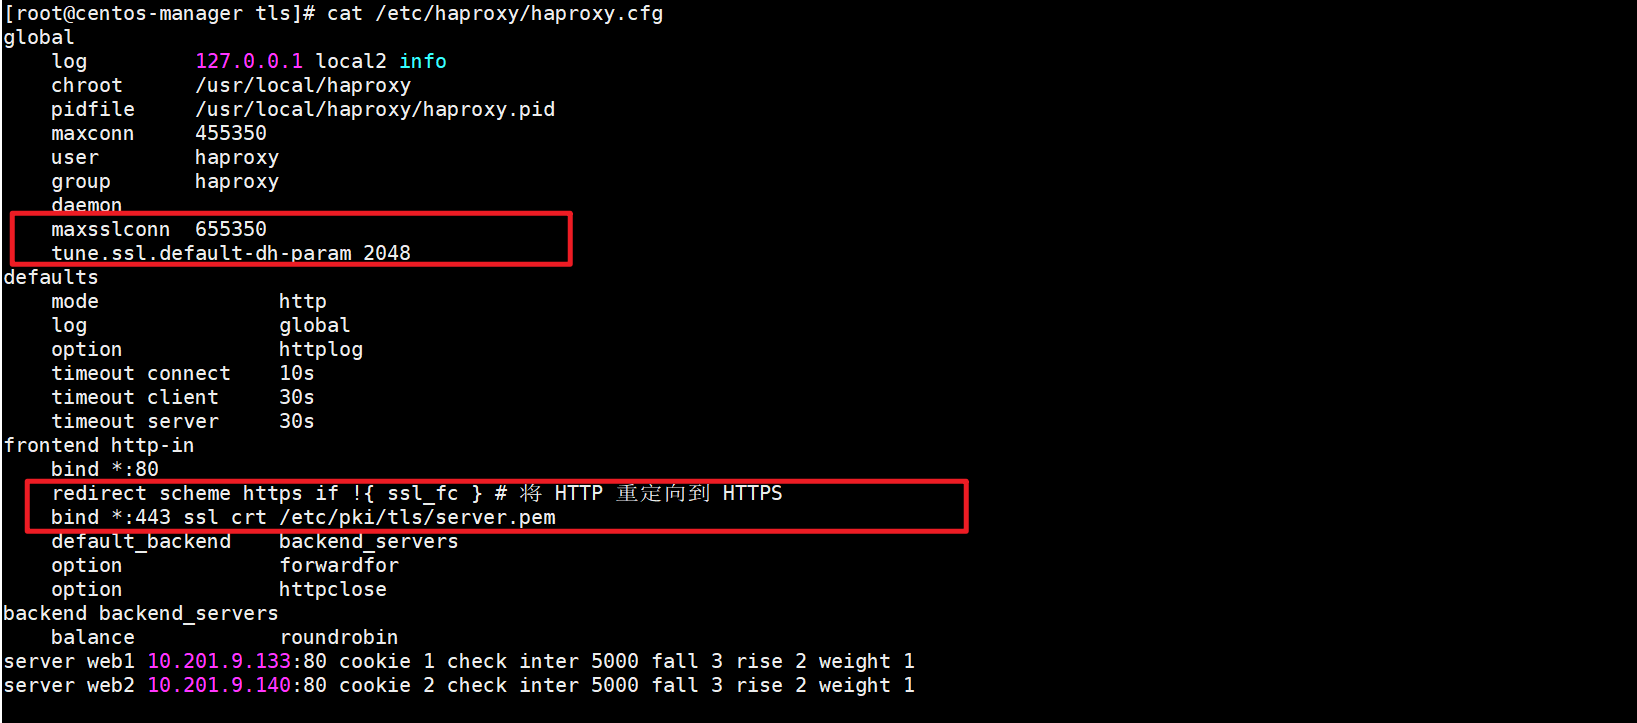
修改haproxy配置文件 1 2 3 4 5 6 7 8 9 10 [root @centos -manager tls ]655350 -dh-param 2048 -in 80 if !{ ssl_fc } 443 ssl crt /etc/pki/tls/certs/zhangbin.pem root @centos -manager tls ]
在global和frontend http-in 中添加相关配置,并重启haproxy
测试 在浏览器中使用https的方式访问HAproxy负载均衡器IP地址看,是否还能正常显示后端服务器web页面。
Haproxy TCP 负载 HAproxy 除了支持HTPP层的负载均衡之外,还支持底层的TCP模式负载均衡,例如数据库、缓存、ssh服务等
环境准备 首先先搭建两台数据库服务器。mariadb
1 [root @node1 yum.repos.d ]
修改数据库密码并设置允许root 用户远程登录
1 2 3 4 5 6 7 8 9 10 11 12 13 14 15 [root @node2 ~]end with ; or \g.3 5.5 .60 -MariaDB MariaDB Server2000 , 2018 , Oracle, MariaDB Corporation Ab and others.Type 'help;' or '\h' for help. Type '\c' to clear the current input statement.none )]> GRANT ALL PRIVILEGES ON *.* TO 'root' @'%' IDENTIFIED BY '1234' -> ; Query OK, 0 rows affected (0.00 sec) MariaDB [(none)]> flush privileges; Query OK, 0 rows affected (0.00 sec)
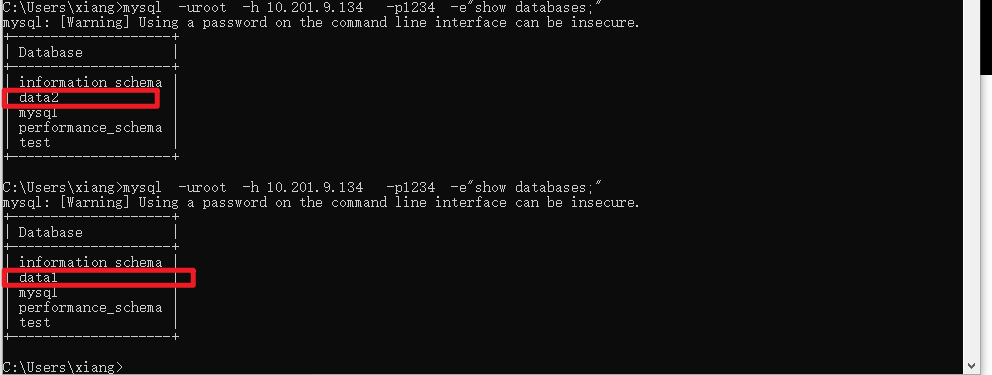
再两台数据库服务器中分别创建一个数据库为data1和data2
1 2 3 4 5 6 7 8 9 10 11 12 13 14 15 16 17 18 19 20 21 22 23 [root @node2 ~]root @node2 ~]-------------------- +-------------------- +-------------------- +root @node1 yum.repos.d ]root @node1 yum.repos.d ]-------------------- +-------------------- +-------------------- +
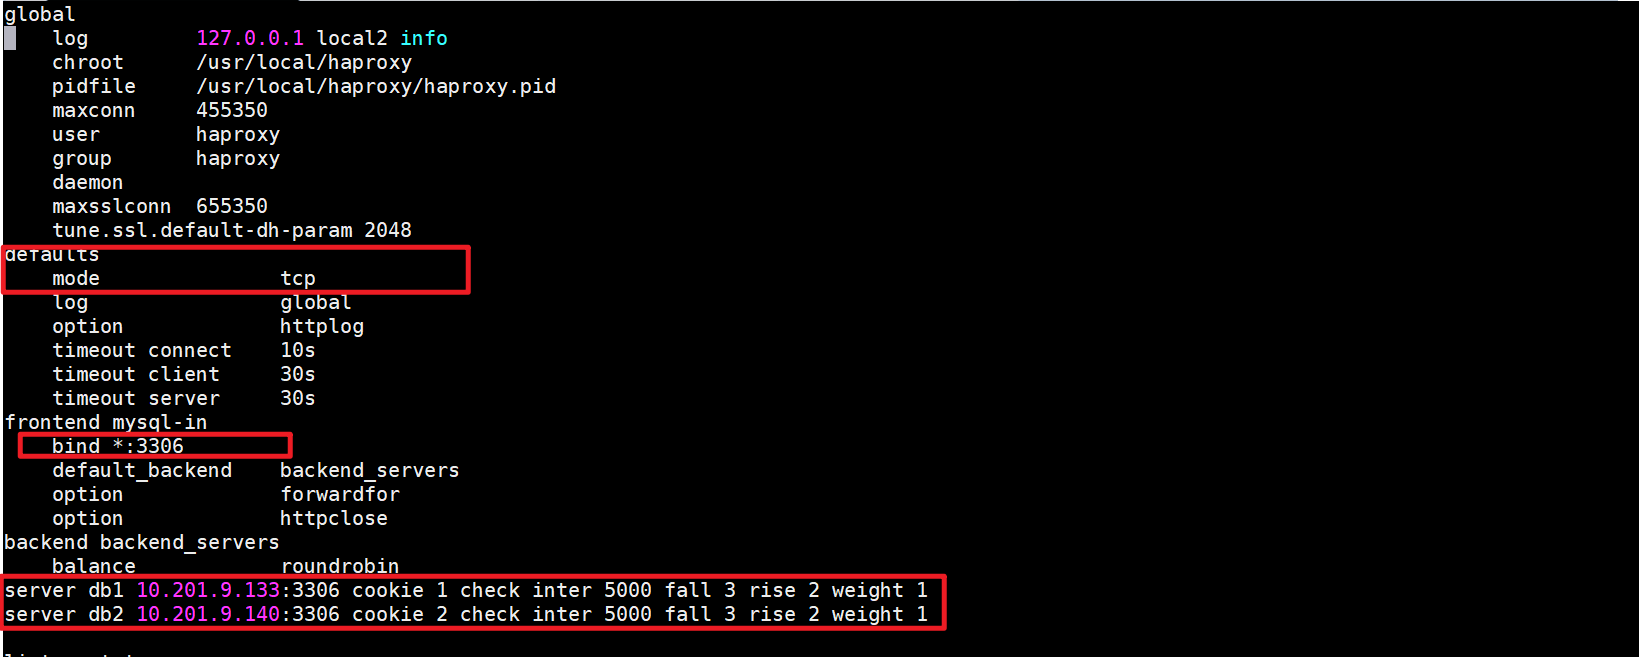
修改HAproxy配置文件 1 2 3 4 5 6 7 8 9 10 11 12 13 14 15 16 17 18 19 20 21 22 23 24 25 26 27 28 29 30 31 32 33 34 35 [root @centos -manager ~]127.0 .0.1 local2 info455350 group haproxy655350 -dh-param 2048 10 s30 s30 s-in 3306 10.201 .9.133 :3306 cookie 1 check inter 5000 fall 3 rise 2 weight 1 10.201 .9.140 :3306 cookie 2 check inter 5000 fall 3 rise 2 weight 1 10000 123 .com
测试 重启HAproxy并测试
Haproxy 负载后端https协议 注意:在配置后端服务器的https访问的时候,后端服务器的ssl证书需要是同一个证书
环境准备 使用之前搭建的两台nginx服务器,并且配置ssl证书,实现https访问,在实现第一个实例的时候,我们已经生成了一个ssl证书,接下来还是使用该ssl证书。将合并前的crt和key证书复制到两台后端服务器中。
1 2 3 4 5 6 7 8 [root @centos -manager certs ]10.201 .9.133 's password: test.crt 100% 1220 1.3MB/s 00:00 test.key 100% 1704 2.0MB/s 00:00 [root@centos-manager certs]# scp test.crt test.key root@10.201.9.140:/etc/pki/tls/certs root@10.201.9.140' s password:100 % 1220 1.6 MB/s 00 :00 100 % 1704 2.6 MB/s 00 :00
1 2 3 4 5 6 7 8 9 [root @node1 html ]443 ssl;"/etc/pki/tls/certs/test.crt" ;"/etc/pki/tls/certs/test.key" ;
node2:
1 2 3 4 5 6 7 8 [root @node2 ~]443 ssl;"/etc/pki/tls/certs/test.crt" ;"/etc/pki/tls/certs/test.key" ;
添加ssl 的配置
修改HAproxy配置文件 1 2 3 4 5 6 7 8 9 10 11 12 13 14 15 16 17 18 19 20 21 22 23 24 25 26 27 28 29 30 31 32 33 34 35 [root @centos -manager ~]127.0 .0.1 local2 info455350 group haproxy655350 -dh-param 2048 10 s30 s30 s-in 443 10.201 .9.133 :443 cookie 1 check inter 5000 fall 3 rise 2 weight 1 10.201 .9.140 :443 cookie 2 check inter 5000 fall 3 rise 2 weight 1 10000 123 .com
重启HAproxy进行测试 1 2 [root @centos -manager ~]
访问HAproxy的https的443端口进行测试