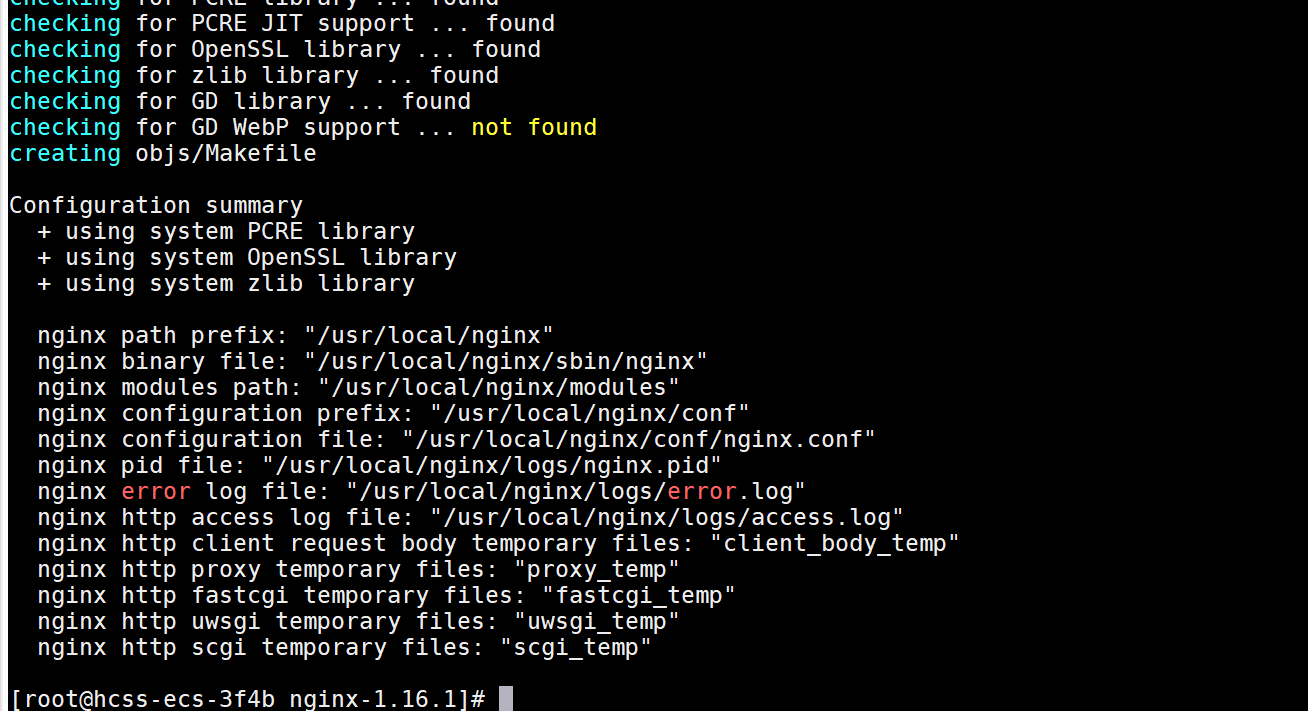
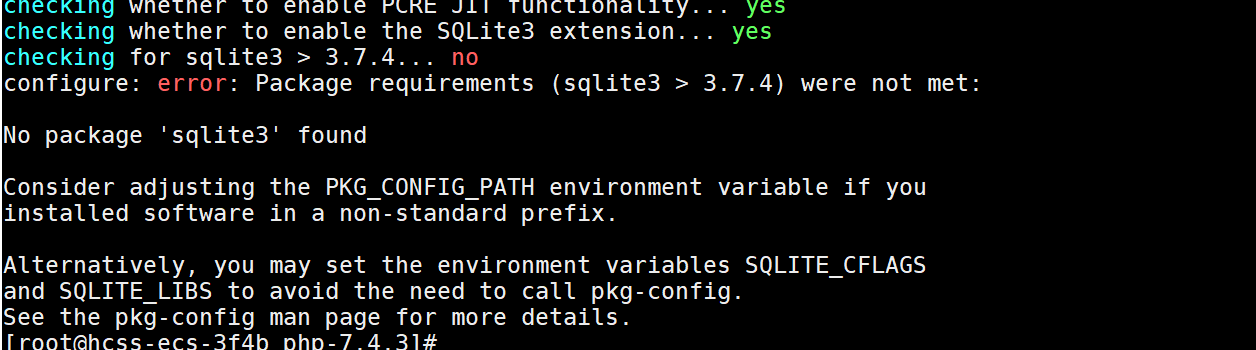
从零搭建高可用 LNMP 架构

nginx—LNMP架构

LNMP Web 架构 是一种广泛使用的开源 Web 服务技术栈,其名称由四个核心组件的首字母组成:

  • L:Linux(操作系统)
  • N:Nginx(Web 服务器 / 反向代理)
  • M:MySQL 或 MariaDB(关系型数据库)
  • P:PHP(服务器端脚本语言)

LNMP 架构工作流程

1
2
3
4
5
6
7
8
9
10
11
用户浏览器
↓ (HTTP/HTTPS 请求)
Nginx(接收请求,静态资源直接返回)
↓(动态请求如 .php)
PHP-FPM(处理 PHP 脚本)
↓(如需读写数据)
MySQL / MariaDB(存储和查询数据)

PHP 将结果返回给 Nginx

Nginx 返回 HTML/JSON 给用户

源代码编译安装php+nginx+mariadb

组件 版本
Nginx 1.16.1
PHP 7.4

更新yum源

编译安装nginx

  • 修改linux的软硬件限制文件

  • 在centos7上边安装源码包所需要的依赖包

1
2
3
4
[root@hcss-ecs-3f4b yum.repos.d]# yum -y install wget openssl* gcc gcc-c++ autoconf libjpeg libjpeg-devel libpng libpng-devel freetype freetype-devel libxml2 libxml2-devel zlib zlib-devel glibc glibc-devel glib2 glib2-devel bzip2 bzip2-devel ncurses ncurses-devel curl curl-devel e2fsprogs e2fsprogs-devel krb5-server.x86_64 krb5-devel.x86_64 libidn libidn-devel openssl openssl-devel openldap openldap-devel nss_ldap openldap-clients openldap-servers make gd.x86_64 gd-devel.x86_64 libaio
Loaded plugins: fastestmirror
Loading mirror speeds from cached hostfile
base | 3.6 kB 00:00:00
  • 下载nginx源码包
1
2
3
4
5
6
7
8
9
10
11
[root@hcss-ecs-3f4b yum.repos.d]# wget http://nginx.org/download/nginx-1.16.1.tar.gz
--2026-01-12 22:56:08-- http://nginx.org/download/nginx-1.16.1.tar.gz
Resolving nginx.org (nginx.org)... 52.58.199.22, 2a05:d014:5c0:2601::6, 2a05:d014:5c0:2600::6
Connecting to nginx.org (nginx.org)|52.58.199.22|:80... connected.
HTTP request sent, awaiting response... 200 OK
Length: 1032630 (1008K) [application/octet-stream]
Saving to: ‘nginx-1.16.1.tar.gz’

100%[==========================================================================>] 1,032,630 19.3KB/s in 53s

2026-01-12 22:57:02 (18.9 KB/s) - ‘nginx-1.16.1.tar.gz’ saved [1032630/1032630]
  • 下载第三方模块
    下载链接:https://github.com/gnosek/nginx-upstream-fair?spm=a2c4e.11153940.blogcont73621.10.752155b9TL5eQp

nginx-upstream-fair 是一个 第三方 Nginx 模块,用于实现 “公平”(Fair)的负载均衡策略,即根据后端服务器的响应时间动态分配请求,而不是简单地轮询,因为本次需要使用到他,所以就一起下载到本地,并一起编译了。
在这里插入图片描述

  • 创建一个运行nginx和php的用户
    在生产环境中,因为root用户权限过大,往往不会使用root用户直接运行三方程序,所以这里需要单独建立一个用户用来运行nginx和php。
    /usr/sbin/groupadd www && /usr/sbin/useradd -s /sbin/nologin -g www www
  • 上传nginx-upstream-fair模块包到服务器并解压
    我这里将nginx-upstream-fair 模块包上传到了/usr/local并进行解压缩的操作
1
2
3
4
5
6
7
8
9
10
11
12
13
14
15
16
17
[root@hcss-ecs-3f4b local]# ls
bin games include lib64 nginx-1.16.1.tar.gz sbin src uniagentd
etc hostguard lib libexec nginx-upstream-fair-master.zip share uniagent
[root@hcss-ecs-3f4b local]# unzip nginx-upstream-fair-master.zip
Archive: nginx-upstream-fair-master.zip
a18b4099fbd458111983200e098b6f0c8efed4bc
creating: nginx-upstream-fair-master/
inflating: nginx-upstream-fair-master/.gdbinit
inflating: nginx-upstream-fair-master/README
inflating: nginx-upstream-fair-master/config
inflating: nginx-upstream-fair-master/ngx_http_upstream_fair_module.c
[root@hcss-ecs-3f4b local]# ls
bin games include lib64 nginx-1.16.1.tar.gz nginx-upstream-fair-master.zip share uniagent
etc hostguard lib libexec nginx-upstream-fair-master sbin src uniagentd
[root@hcss-ecs-3f4b local]# pwd
/usr/local
[root@hcss-ecs-3f4b local]#
  • 解压nginx
    我这里将nginx也下载到了/usr/local下面,也是正常进行解压缩
1
2
3
[root@hcss-ecs-3f4b local]# tar -zxvf nginx-1.16.1.tar.gz
nginx-1.16.1/
nginx-1.16.1/auto/
  • 编译nginx
    命令:
1
2
3
4
5
6
7
8
9
10
11
12
13
14
./configure \
--user=www \
--group=www \
--prefix=/usr/local/nginx \
--with-http_stub_status_module \
--with-http_ssl_module \
--with-http_v2_module \
--with-http_realip_module \
--with-http_image_filter_module \
--add-module=/usr/local/nginx-upstream-fair-master \
--with-stream \
--with-http_flv_module \
--with-http_gzip_static_module \
--with-pcre
参数 说明
--user=www 指定 Nginx 工作进程(worker processes)运行的用户为 www。提升安全性,避免以 root 运行。
--group=www 指定 Nginx 工作进程运行的用户组为 www。需确保该用户和组已存在(通常通过 useradd -r -s /sbin/nologin -M www 创建)。
--prefix=/usr/local/nginx 指定 Nginx 的安装目录。安装后,配置文件、日志、可执行文件等都会放在该目录下(如 /usr/local/nginx/conf/nginx.conf)。
--with-http_stub_status_module 启用 Nginx 状态监控模块。可通过访问 http://your-domain/status 查看连接数、请求处理状态等(需在配置中开启 location /status { stub_status; })。
--with-http_ssl_module 启用 HTTPS/SSL/TLS 支持。必须开启才能使用 listen 443 ssl; 和证书配置。
--with-http_v2_module 启用 HTTP/2 协议支持(Nginx 1.9.5+ 内置)。提升现代浏览器加载性能。
--with-http_realip_module 启用获取真实客户端 IP 模块。当 Nginx 前面有反向代理(如 CDN、LB)时,可通过 X-Forwarded-For 获取真实 IP。
--with-http_image_filter_module 启用图片处理模块(如动态裁剪、缩放 JPEG/PNG/GIF)。依赖 GD 库,需系统安装 gd-devel
--add-module=/usr/local/nginx-upstream-fair-master 添加第三方模块:nginx-upstream-fair,实现基于响应时间的“公平”负载均衡(非官方模块,需提前下载源码)。
--with-stream 启用 TCP/UDP 四层代理模块(stream{} 块),可用于代理 MySQL、Redis、DNS 等非 HTTP 服务。
--with-http_flv_module 启用 FLV 视频流伪 streaming 支持(通过 ?start=xxx 跳转)。适用于老式 Flash 视频播放(现代已较少使用)。
--with-http_gzip_static_module 启用预压缩 .gz 文件支持。如果存在 style.css.gz,且客户端支持 gzip,Nginx 会直接返回该文件,节省 CPU 压缩开销。
--with-pcre 启用 PCRE(Perl Compatible Regular Expressions)库支持。用于 locationrewrite 等正则匹配。需系统已安装 pcre-devel
1
2
3
4
5
6
7
8
[root@hcss-ecs-3f4b local]# cd nginx-1.16.1
[root@hcss-ecs-3f4b nginx-1.16.1]# ls
auto CHANGES CHANGES.ru conf configure contrib html LICENSE man README src
[root@hcss-ecs-3f4b nginx-1.16.1]#
[root@hcss-ecs-3f4b nginx-1.16.1]#
[root@hcss-ecs-3f4b nginx-1.16.1]# ./configure --user=www --group=www --prefix=/usr/local/nginx --with-http_stub_status_module --with-http_ssl_module --with-http_v2_module --with-http_realip_module --with-http_image_filter_module --add-module=/usr/local/nginx-upstream-fair-master --with-stream --with-http_flv_module --with-http_gzip_static_module --with-pcre
checking for OS
+ Linux 3.10.0-1160.119.1.el7.x86_64 x86_64
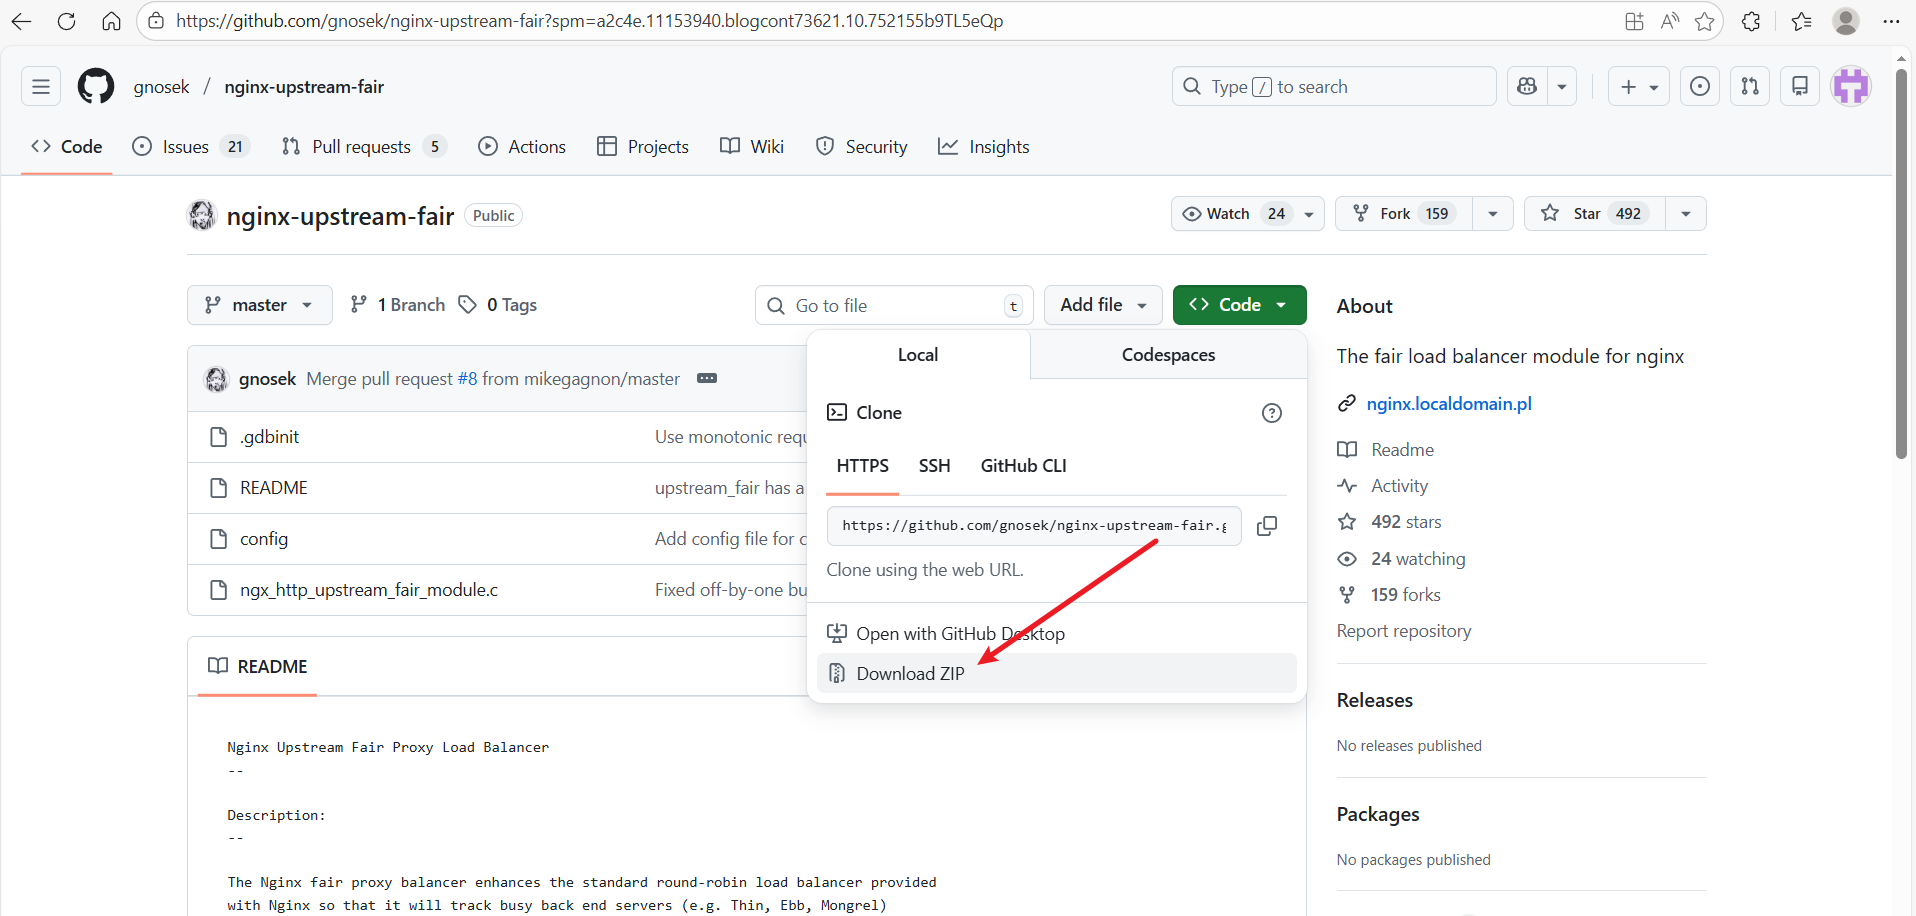
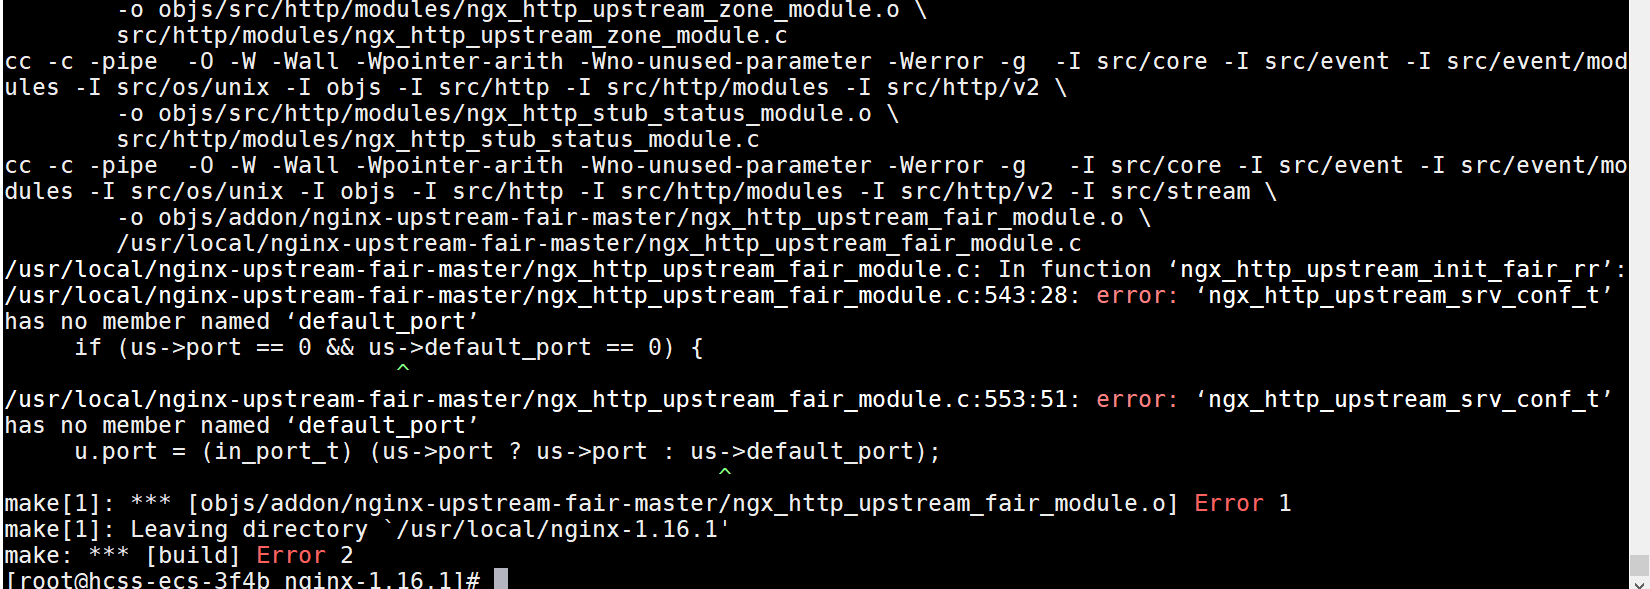
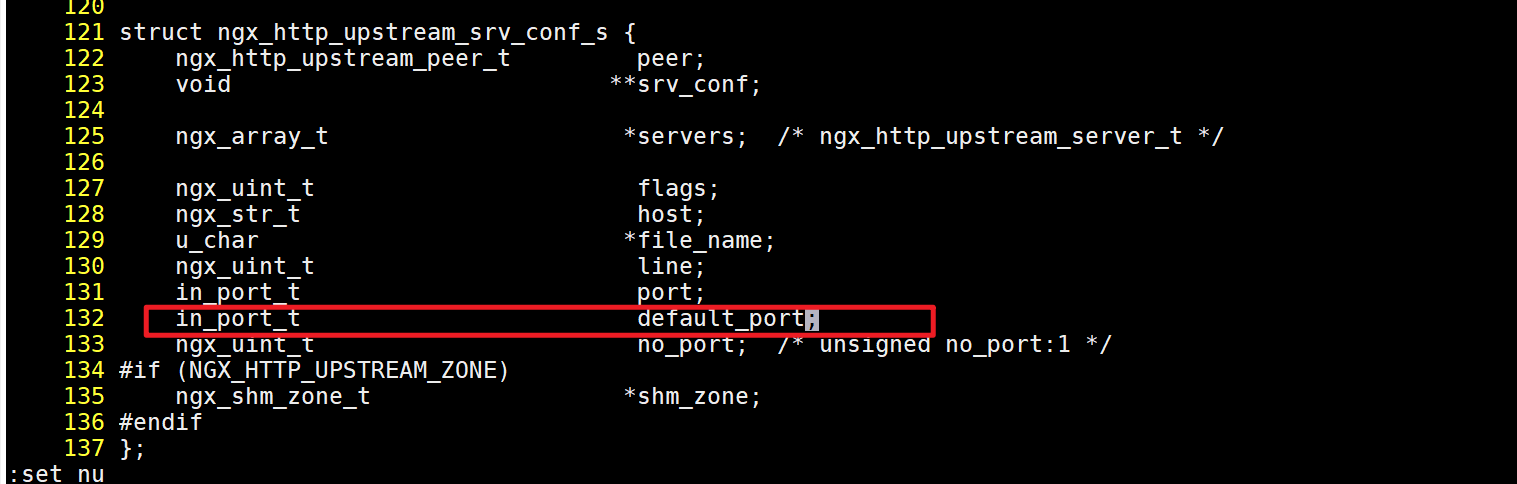
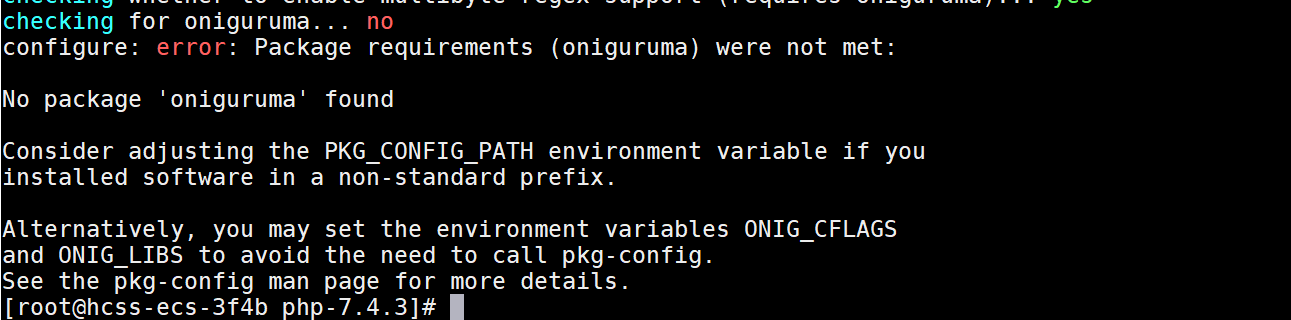
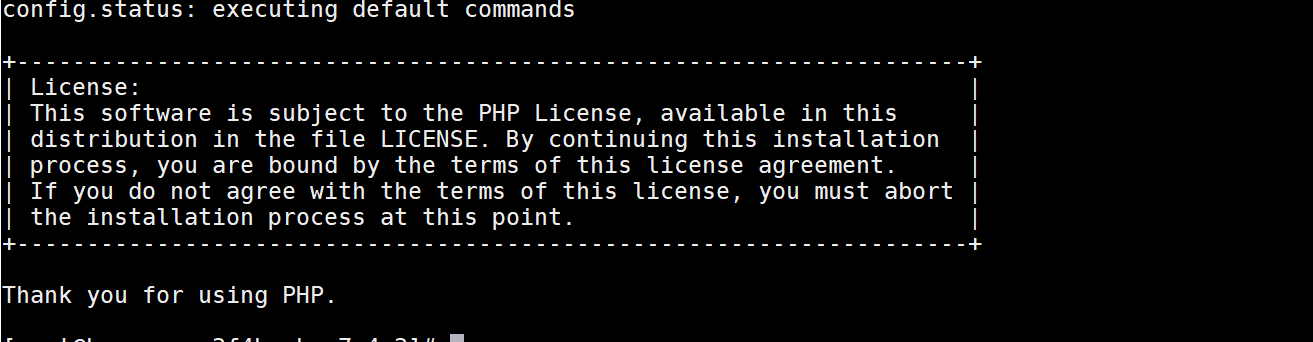
如下图,编译完成之后,如果没有报错的话,继续进行下一步即可。
在这里插入图片描述
接着进行编译make && make install
在进行make的时候,我这里报了一个错误,如下图,这是nginx的版本较高,所有的参数被取消,需要修改一下nginx中的配置文件。
在这里插入图片描述
修改nginx目录中的src/http/ngx_http_upstream.h
添加:in_port_t default_port;
在这里插入图片描述
修改完之后,在进行make && make install编译就正常了。

  • 编写nginx的启动单元
1
2
3
4
5
6
7
8
9
10
11
12
13
14
15
16
17
[root@hcss-ecs-3f4b nginx-1.16.1]# vim /usr/lib/systemd/system/nginx.service
[Unit]
Description=nginx - high performance web server
Documentation=https://nginx.org/en/docs/
After=network.target remote-fs.target nss-lookup.target

[Service]
Type=forking
PIDFile=/usr/local/nginx/logs/nginx.pid
ExecStartPre=/usr/local/nginx/sbin/nginx -t -c /usr/local/nginx/conf/nginx.conf
ExecStart=/usr/local/nginx/sbin/nginx -c /usr/local/nginx/conf/nginx.conf
ExecReload=/bin/kill -s HUP $MAINPID
ExecStop=/bin/kill -s QUIT $MAINPID
PrivateTmp=true

[Install]
WantedBy=multi-user.target
  • 启动测试
    使用systemctl daemon-reload systemctl start nginx.service 启动测试
1
2
3
4
5
6
7
8
9
10
11
12
13
14
15
16
17
18
19
20
21
22
23
[root@hcss-ecs-3f4b nginx-1.16.1]# systemctl daemon-reload
[root@hcss-ecs-3f4b nginx-1.16.1]# systemctl start nginx.service
[root@hcss-ecs-3f4b nginx-1.16.1]#
[root@hcss-ecs-3f4b nginx-1.16.1]#
[root@hcss-ecs-3f4b nginx-1.16.1]# systemctl status nginx
● nginx.service - nginx - high performance web server
Loaded: loaded (/usr/lib/systemd/system/nginx.service; disabled; vendor preset: disabled)
Active: active (running) since Wed 2026-01-14 21:47:54 CST; 5s ago
Docs: https://nginx.org/en/docs/
Process: 2671 ExecStart=/usr/local/nginx/sbin/nginx -c /usr/local/nginx/conf/nginx.conf (code=exited, status=0/SUCCESS)
Process: 2669 ExecStartPre=/usr/local/nginx/sbin/nginx -t -c /usr/local/nginx/conf/nginx.conf (code=exited, status=0/SUCCESS)
Main PID: 2674 (nginx)
CGroup: /system.slice/nginx.service
├─2674 nginx: master process /usr/local/nginx/sbin/nginx -c /usr/local/nginx/conf/nginx.conf
└─2675 nginx: worker process

Jan 14 21:47:54 hcss-ecs-3f4b systemd[1]: Starting nginx - high performance web server...
Jan 14 21:47:54 hcss-ecs-3f4b nginx[2669]: nginx: the configuration file /usr/local/nginx/conf/nginx.conf sy...is ok
Jan 14 21:47:54 hcss-ecs-3f4b nginx[2669]: nginx: configuration file /usr/local/nginx/conf/nginx.conf test i...ssful
Jan 14 21:47:54 hcss-ecs-3f4b systemd[1]: Started nginx - high performance web server.
Hint: Some lines were ellipsized, use -l to show in full.
[root@hcss-ecs-3f4b nginx-1.16.1]# ss -luntp | grep 80
tcp LISTEN 0 511 *:80 *:* users:(("nginx",pid=2675,fd=6),("nginx",pid=2674,fd=6))

通过浏览器访问系统IP地址的80端口,如果能够出现nginx的欢迎页面,说明nginx安装成功。
在这里插入图片描述

编译安装PHP

php下载地址:https://www.php.net/distributions/php-7.4.3.tar.bz2

  • 下载并解压php的安装包
    我这里还是下载到了/usr/local/下面
1
2
3
4
5
6
7
8
9
10
11
12
13
14
15
16
17
18
19
20
21
[root@hcss-ecs-3f4b local]# wget https://www.php.net/distributions/php-7.4.3.tar.bz2
--2026-01-14 21:52:30-- https://www.php.net/distributions/php-7.4.3.tar.bz2
Resolving www.php.net (www.php.net)... 185.85.0.29
Connecting to www.php.net (www.php.net)|185.85.0.29|:443... connected.
HTTP request sent, awaiting response... 200 OK
Length: unspecified [application/x-bzip2]
Saving to: ‘php-7.4.3.tar.bz2’

[root@hcss-ecs-3f4b local]# tar -jxvf php-7.4.3.tar.bz2
php-7.4.3/
php-7.4.3/buildconf.bat
php-7.4.3/azure-pipelines.yml
php-7.4.3/README.md
php-7.4.3/configure.ac
php-7.4.3/win32/
php-7.4.3/win32/sockets.c
php-7.4.3/win32/codepage.c
php-7.4.3/win32/php_stdint.h
php-7.4.3/win32/fnmatch.c
php-7.4.3/win32/sendmail.c
php-7.4.3/win32/grp.h
  • 编译PHP
1
2
3
[root@hcss-ecs-3f4b local]# cd php-7.4.3
[root@hcss-ecs-3f4b php-7.4.3]# ./configure --prefix=/usr/local/php/php74 --enable-gd --with-curl --enable-fpm --enable-cgi --with-openssl --enable-mbstring --with-pdo-mysql --with-zlib --with-zip --with-mysqli --enable-opcache --enable-mysqlnd --with-libxml --with-jpeg --with-freetype --with-pdo-sqlite --with-sqlite3 --enable-cli --enable-shared --enable-exif

在编译的时候,遇到了以下几个报错
在这里插入图片描述
在这里插入图片描述
在这里插入图片描述
这里是因为缺少了软件包,使用yum安装即可

1
2
yum -y install libsqlite3-dev sqlite-devel
yum install oniguruma-devel

看见下面的信息就是安装成功了
在这里插入图片描述

  • 安装php
1
[root@hcss-ecs-3f4b php-7.4.3]# make  && make install

在这里插入图片描述

  • 复制php的配置文件到php的安装目录中
    安装完成之后就在php的解压目录中进行复制
1
2
3
4
5
6
7
[root@hcss-ecs-3f4b php-7.4.3]# cp php.ini-development /usr/local/php/php74/lib/php.ini
[root@hcss-ecs-3f4b php-7.4.3]#
[root@hcss-ecs-3f4b php-7.4.3]# cd sapi/fpm
[root@hcss-ecs-3f4b fpm]# cp php-fpm.service /lib/systemd/system/php74-fpm.service
[root@hcss-ecs-3f4b fpm]# cp init.d.php-fpm /etc/init.d/php74-fpm
[root@hcss-ecs-3f4b fpm]# chmod 755 /etc/init.d/php74-fpm
[root@hcss-ecs-3f4b fpm]#
  • 配置php-fpm
1
2
3
4
[root@hcss-ecs-3f4b fpm]# cd /usr/local/php/php74/etc/
[root@hcss-ecs-3f4b etc]# cp php-fpm.conf.default ./php-fpm.conf
[root@hcss-ecs-3f4b etc]# cd /usr/local/php/php74/etc/php-fpm.d
[root@hcss-ecs-3f4b php-fpm.d]# cp www.conf.default www.conf
  • 设置php匿名用户与端口9000
1
2
3
4
[root@hcss-ecs-3f4b php-fpm.d]# vi /usr/local/php/php74/etc/php-fpm.d/www.conf
user = www
group = www
listen = 127.0.0.1:9000

php.ini的配置,把时区改为东八区,编辑php.ini:

1
2
3
4
[root@hcss-ecs-3f4b php-fpm.d]# vi /usr/local/php/php74/lib/php.ini
date.timezone = "Asia/Shanghai"
mysqli.default_socket = /var/lib/mysql/mysql.sock
pdo_mysql.default_socket= /var/lib/mysql/mysql.sock
  • 扩展安装
    wordpress需要用到imagick扩展
1
2
3
4
5
6
7
8
9
10
11
12
13
14
15
[root@hcss-ecs-3f4b local]# wget https://pecl.php.net/get/imagick-3.4.4.tgz
--2026-01-14 22:34:21-- https://pecl.php.net/get/imagick-3.4.4.tgz
Resolving pecl.php.net (pecl.php.net)... 185.85.0.29, 2a02:cb40:200::1ad
Connecting to pecl.php.net (pecl.php.net)|185.85.0.29|:443... connected.
HTTP request sent, awaiting response... 200 OK
Length: 253434 (247K) [application/octet-stream]
Saving to: ‘imagick-3.4.4.tgz’

100%[==========================================================================>] 253,434 241KB/s in 1.0s

2026-01-14 22:34:25 (241 KB/s) - ‘imagick-3.4.4.tgz’ saved [253434/253434]

[root@hcss-ecs-3f4b local]# tar -xf imagick-3.4.4.tgz
[root@hcss-ecs-3f4b local]# cd imagick-3.4.4
[root@hcss-ecs-3f4b imagick-3.4.4]# yum -y install autoconf ImageMagick-devel
  • 编译安装,以下命令在 imagick-3.4.4目录下执行
1
2
3
4
5
6
7
[root@hcss-ecs-3f4b imagick-3.4.4]# /usr/local/php/php74/bin/phpize
Configuring for:
PHP Api Version: 20190902
Zend Module Api No: 20190902
Zend Extension Api No: 320190902
[root@hcss-ecs-3f4b imagick-3.4.4]# ./configure --with-php-config=/usr/local/php/php74/bin/php-config --with-imagick=/usr/local/imagemagick
[root@hcss-ecs-3f4b imagick-3.4.4]# make && make install

在这里插入图片描述

  • 启用扩展
    在php.ini中配置启用扩展 vi /usr/local/php/php74/lib/php.ini ,可以在配置文件的最后两行添加
1
2
3
[root@hcss-ecs-3f4b imagick-3.4.4]# vi /usr/local/php/php74/lib/php.ini
extension_dir = "/usr/local/php/php74/lib/php/extensions/no-debug-non-zts-20190902/"
extension=imagick.so
  • 编辑php-fpm的启动单元
1
2
3
4
5
6
7
8
9
10
11
[root@hcss-ecs-3f4b imagick-3.4.4]# vim /usr/lib/systemd/system/php-fpm.service
[Unit]
Description=The PHP FastCGI Process Manager
After=syslog.target network.target

[Service]
Type=simple
PIDFile=/usr/local/php/php74/var/run/php-fpm.pid
ExecStart=/usr/local/php/php74/sbin/php-fpm --nodaemonize --fpm-config /usr/local/php/php74/etc/php-fpm.conf
[Install]
WantedBy=multi-user.target
  • 启动php-fpm
1
2
3
4
5
6
7
[root@hcss-ecs-3f4b imagick-3.4.4]# systemctl  daemon-reload
[root@hcss-ecs-3f4b imagick-3.4.4]# systemctl start php-fpm
[root@hcss-ecs-3f4b imagick-3.4.4]# systemctl enable php-fpm
Created symlink from /etc/systemd/system/multi-user.target.wants/php-fpm.service to /usr/lib/systemd/system/php-fpm.service.
[root@hcss-ecs-3f4b imagick-3.4.4]# netstat -anop | grep 9000
tcp 0 0 127.0.0.1:9000 0.0.0.0:* LISTEN 26445/php-fpm: mast off (0.00/0/0)
[root@hcss-ecs-3f4b imagick-3.4.4]#

编译安装mariadb10.6.24

  • 安装稳定版mariadb10.6.24添加安装源:
1
2
3
4
5
6
7
[root@hcss-ecs-3f4b imagick-3.4.4]# vim /etc/yum.repos.d/mariadb.repo
[mariadb]
name = MariaDB
baseurl = https://mirrors.tuna.tsinghua.edu.cn/mariadb/mariadb-10.6.24/yum/centos7-amd64/
gpgkey=http://yum.mariadb.org/RPM-GPG-KEY-MariaDB
gpgcheck=0
enabled=1
  • 安装mariadb
1
2
3
4
5
6
 [root@hcss-ecs-3f4b imagick-3.4.4]# yum install MariaDB-server.x86_64 MariaDB-client.x86_64 MariaDB-devel.x86_64
root@hcss-ecs-3f4b imagick-3.4.4]# systemctl start mariadb.service
[root@hcss-ecs-3f4b imagick-3.4.4]# systemctl enable mariadb.service
Created symlink from /etc/systemd/system/multi-user.target.wants/mariadb.service to /usr/lib/systemd/system/mariadb.service.
[root@hcss-ecs-3f4b imagick-3.4.4]#

  • 重置数据库root用户密码:
1
2
3
4
5
6
7
8
9
10
11
12
13
14
15
16
17
18
 #跳过权限表启动:
[root@hcss-ecs-3f4b log]# mysqld_safe --skip-grant-tables --skip-networking &
[root@hcss-ecs-3f4b log]# mysql -u root
Welcome to the MariaDB monitor. Commands end with ; or \g.
Your MariaDB connection id is 3
Server version: 10.6.19-MariaDB MariaDB Server

Copyright (c) 2000, 2018, Oracle, MariaDB Corporation Ab and others.

Type 'help;' or '\h' for help. Type '\c' to clear the current input statement.
MariaDB [(none)]> FLUSH PRIVILEGES;
Query OK, 0 rows affected (0.001 sec)

MariaDB [(none)]> ALTER USER 'root'@'localhost' IDENTIFIED BY 'root';
Query OK, 0 rows affected (0.000 sec)

MariaDB [(none)]> exit
Bye

使用ps -ef 的命令找出mariadb的进程pid号,将他们kill之后再启动mariadb数据库

1
2
3
4
5
6
7
8
9
10
11
12
13
14
15
16
17
18
19
20
21
[root@hcss-ecs-3f4b log]# ps -ef | grep mariadb
mysql 29924 1 0 23:04 pts/0 00:00:00 /usr/sbin/mariadbd --basedir=/usr --datadir=/var/lib/mysql --plugin-dir=/usr/lib64/mysql/plugin --user=mysql --skip-grant-tables --skip-networking --log-error=/var/lib/mysql/hcss-ecs-3f4b.err --pid-file=hcss-ecs-3f4b.pid
root 30726 32704 0 23:09 pts/0 00:00:00 grep --color=auto mariadb
[root@hcss-ecs-3f4b log]#
[root@hcss-ecs-3f4b log]#
[root@hcss-ecs-3f4b log]#
[root@hcss-ecs-3f4b log]# kill -9 29924
[root@hcss-ecs-3f4b log]# systemctl start mariadb
# 使用刚刚设置的root密码登录数据库
[root@hcss-ecs-3f4b log]# mysql -uroot -p
Enter password:
Welcome to the MariaDB monitor. Commands end with ; or \g.
Your MariaDB connection id is 3
Server version: 10.6.19-MariaDB MariaDB Server

Copyright (c) 2000, 2018, Oracle, MariaDB Corporation Ab and others.

Type 'help;' or '\h' for help. Type '\c' to clear the current input statement.

MariaDB [(none)]>

到以上为止,我们的mariadb就搭建好了,接下来就是修改配置,让nginx和php和mariadb的数据库进行互联,并搭建一个博客网站,本次案例就使用wordpress进行搭建

搭建wordpress博客站点

  • 修改nginx配置文件
    nginx主配置文件如下
1
2
3
4
5
6
7
8
9
10
11
12
13
14
15
16
17
18
19
20
21
22
23
24
25
26
27
28
29
30
31
32
33
34
35
36
37
38
39
40
41
42
43
44
45
46
47
48
49
50
51
52
53
54
55
56
57
58
59
60
61
62
63
64
65
66
67
68
69
70
71
72
73
74
75
76
77
78
79
80
81
82
83
84
85
86
87
88
89
90
91
92
93
94
95
96
97
98
99
100
101
102
103
104
105
106
107
108
109
110
111
112
113
114
115
116
117
118
119
120
121
122
123
124
125
126
127
128
129
130
131
132
 #建议在修改前做个备份
[root@hcss-ecs-3f4b log]# vi /usr/local/nginx/conf/nginx.conf
user www;
worker_processes auto;
worker_cpu_affinity 00000001 00000010;

#error_log logs/error.log;
#error_log logs/error.log notice;
#error_log logs/error.log info;

#pid logs/nginx.pid;


events {
use epoll;
worker_connections 65535;
}


http {
include mime.types;
default_type application/octet-stream;

log_format main '$remote_addr - $remote_user [$time_local] "$request" '
'$status $body_bytes_sent "$http_referer" '
'"$http_user_agent" "$http_x_forwarded_for"';

access_log logs/access.log main;

#默认编码
charset utf-8;
#服务器名字的hash表大小
server_names_hash_bucket_size 128;
#上传文件大小限制
client_header_buffer_size 32k;
#设定请求缓
large_client_header_buffers 4 64k;
client_max_body_size 8m;
#开启目录列表访问,合适下载服务器,默认关闭
#autoindex on;
#长连接超时时间,单位是秒
keepalive_timeout 120;
sendfile on; #开启高效文件传输模式
tcp_nopush on; #防止网络阻塞
tcp_nodelay on;
types_hash_max_size 2048;
gzip on;
include /usr/local/nginx/conf/conf.d/*.conf;

server {
listen 80;
server_name localhost;

#charset koi8-r;

#access_log logs/host.access.log main;

location / {
root html;
index index.html index.htm;
}

#error_page 404 /404.html;

# redirect server error pages to the static page /50x.html
#
error_page 500 502 503 504 /50x.html;
location = /50x.html {
root html;
}

# proxy the PHP scripts to Apache listening on 127.0.0.1:80
#
#location ~ \.php$ {
# proxy_pass http://127.0.0.1;
#}

# pass the PHP scripts to FastCGI server listening on 127.0.0.1:9000
#
#location ~ \.php$ {
# root html;
# fastcgi_pass 127.0.0.1:9000;
# fastcgi_index index.php;
# fastcgi_param SCRIPT_FILENAME /scripts$fastcgi_script_name;
# include fastcgi_params;
#}

# deny access to .htaccess files, if Apache's document root
# concurs with nginx's one
#
#location ~ /\.ht {
# deny all;
#}
}


# another virtual host using mix of IP-, name-, and port-based configuration
#
#server {
# listen 8000;
# listen somename:8080;
# server_name somename alias another.alias;

# location / {
# root html;
# index index.html index.htm;
# }
#}


# HTTPS server
#
#server {
# listen 443 ssl;
# server_name localhost;

# ssl_certificate cert.pem;
# ssl_certificate_key cert.key;

# ssl_session_cache shared:SSL:1m;
# ssl_session_timeout 5m;

# ssl_ciphers HIGH:!aNULL:!MD5;
# ssl_prefer_server_ciphers on;

# location / {
# root html;
# index index.html index.htm;
# }
#}

}

==include /usr/local/nginx/conf/conf.d/*.conf;==
这里使用了include引入了外部的配置文件,所以需要再nginx的conf目录下再创建一个conf.d来保存项目配置

1
2
3
4
5
6
7
8
9
10
11
12
13
14
15
16
17
18
19
20
21
22
 [root@hcss-ecs-3f4b conf]# mkdir -p  /usr/local/nginx/conf/conf.d/
[root@hcss-ecs-3f4b conf]# vi /usr/local/nginx/conf/conf.d/wordpress.conf
server {
listen 80;
server_name localhost;
location / {
root /web/wordpress;
index index.php index.html index.htm;
}
error_page 500 502 503 504 /50x.html;
location = /50x.html {
root /usr/share/nginx/html;
}
location ~ \.php$ {
root /web/wordpress;
fastcgi_pass 127.0.0.1:9000;
fastcgi_index index.php;
#fastcgi_param SCRIPT_FILENAME $document_root$fastcgi_script_name;
#include fastcgi_params;
include fastcgi.conf;
}
}

  • 下载并配置wordpress
    下载链接:https://cn.wordpress.org/latest-zh_CN.zip
    这里下载完了wordpress之后需要将文件解压到/web/目录下,并编辑配置wp-config.php配置文件,这个配置文件,默认是没有需要的,需要复制目录里面的模板文件
1
2
 [root@hcss-ecs-3f4b wordpress]# cp wp-config-sample.php   ./wp-config.php
[root@hcss-ecs-3f4b wordpress]# vi wp-config.php

修改一下四个位置即可,分别是数据库名字,数据库用户名、数据库密码、数据库地址在这里插入图片描述
提前:需要你的数据库中有wordpress的数据库才行。

  • 以上配置完毕之后,重启nginx、PHP、以及maridb的服务
1
2
3
systemctl restart nginx.service 
systemctl enable php-fpm.service
systemctl enable mariadb.service
  • 访问测试
    在这里插入图片描述
    直接在浏览器中输入IP地址访问即可。

从零搭建高可用 LNMP 架构
https://www.situgou.top/2026/01/18/LNMP【web架构】/
作者
xqj_Blog
发布于
2026年1月18日
许可协议